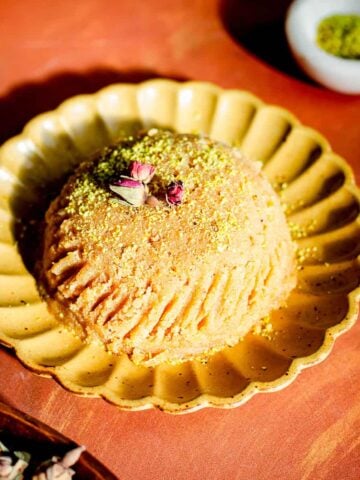
Cold Milk Baklava (Soguk Baklava) - Cold Milk Baklava is one of those desserts that makes people pause after the first bite. It's soft but crisp, sweet but light, familiar but surprising. In this recipe, crushed pistachio nuts are sandwiched between layers upon layers of crispy, flaky buttery filo pastry and then the Bakalva is soaked in a milky syrup that is creamy, silky and cooling. It is also sometimes spiced gently with Cinnamon, Cardamom and sometimes Nutmeg too. Once it is assembled, it goes into the fridge to set. It is then topped with grated Chocolate and more ground Pistachios. It reminds me a little bit of of Sütlü Nuriye which is made with Hazelnuts, Filo and Milk.
")
Jump to:
What Is Cold Milk Baklava?
Cold Milk Baklava is a Turkish dessert that takes the richness of traditional baklava and tempers it with cool milk syrup. The result is something lighter, creamier, and incredibly refreshing.
Unlike classic baklava, which can sometimes be quite sweet and sticky, this version has a beautiful balance. The milk syrup absorbs into the pastry and adds a custard-like layer that makes each bite melt in your mouth.
The iconic Turkish Baklava is my all time favourite pastry based dessert and this version is is a variation that I enjoy during the warmer months.
With Cold Milk Baklva, once most of the hard work of assembly is done, you pour a milk syrup over the Baklava while it's still piping hot. You will hear it sizzle and and the tops of the Baklava will slightly lift as they yield to absorb all the goodness of the syrup.
Worry not, the Baklava still remains crisp but the Pistachios become syrupy and delicious!
Once it is done, it goes into the fridge to set. It is then topped with grated Chocolate and more ground Pistachios.
This version of Baklava has gained popularity over the past few years. It is a crispy, gentle, comforting and creamy delight. It is perfect for celebrations like Eid, Ramadan, Parties and because it is so refreshing, it's also ideal for heatwaves like the one we are experiencing right now!
If you are a fan of Baklava, please try this Chocolate Pistachio Baklava. Described as the best Baklava ever by my sister in law!
What you will need to make it
Please scroll down to the recipe card at the bottom of the page for the full ingredients list with measurements.
")
Phyllo/Filo dough: You can find Filo dough in the fridge or freezer section of most supermarkets near the Puff Pastry, Pizza Dough etc. Filo is very thin and should be kept in the packaging, until you're ready to assemble the baklava. Whilst assemling, be sure to cover it with a damp cloth so that it does not dry out.
Nuts: I love using Pistachios or Walnuts or a combination of both. I chop/pulse them using a food processor and I always roast them first because hello flavour town.
Note - Baklava is made with a variety of nuts across the Mediterranean and Middle East, the most common being walnuts, hazlenuts, pistachios and almonds. Sometimes just one of these, sometimes a combination. Use your favourite!
Ghee: Ghee adds flavour and it won't burn. Use all the melted Ghee in order to get crispy layers and add more if needed. Brush it between each layer of Filo. Butter does not work here as it burns at high temperatures and you will be left with burnt (black) bits of Butter.
Sugar: We need caster or granulated sugar to make the Milk syrup.
Milk and Double (Heavy) Cream - Whole full fat milk mixed with full fat cream is preferred for a rich milky syrup. Skimmed or Semi Skimmed milk can work but the flavour is not as rich and Baklava is all about indulgence.
Chocolate or Cocoa Powder - The is used to dust the top. It adds flavour but also gives a distinct look to the Baklava. You can use either one or the other. I prefer grated Chocolate.
How to handle Filo pastry
Get Fresh Filo - Get fresh Filo pastry from the fridge section rather then the freezer section. It is easier to handle because there's no need to thaw it which makes it more pliable and less likely to get soggy. If you do get frozen, leave it in the fridge overnight to defrost slowly. In both case, take it out of the fridge 30 minutes beforehand.
Keep the pastry covered whilst layering - cover with a slightly damp tea towel to ensure it doesn't dry out.
Handle gently - Use a gentle touch because it does tear easily. If it does teat though, it is not the end of the world. Just reassemble like a jigsaw.
How to make Baklava
Step 1 - Make the simple syrup
Place the sugar, milk and cream in a pot/saucepan. (I also sometimes add Cinnamon and Cardamom at this stage).
Bring to a boil over a medium high heat. Once it comes to a simmer, lower the heat to medium and simmer for 15 minutes until it thickens slightly. Set the syrup aside to cool completely.
")
Note - The cooled syrup can be made up to 2 days in advance and stored in the fridge.
Step 2 - Prepare the filling (Roast the Nuts and make the Nut Mixture)
Spread the Pistachio Nuts on to a baking sheet/tray and roast in the oven for 25 minutes. Then add to the bowl of a food processor and blend to a coarse crumb. Transfer to a large bowl and stir in Cinnamon powder, Cardamom powder and Salt. Mix well to fully combine.
")
")
Step 3 - Melt the Ghee (only necessary in Winter)
Add Ghee to a bowl and place in the microwave. Warm in 10 second bursts and stir with a spoon.
Step 4 - Begin to assemble the first Few layers of the Baklava
Brush a 9 x 13 inch baking tin with some of the Ghee.
Remove the thawed Filo/Phyllo pastry from the packaging and unroll onto a clean surface.
Using the tin as a guide, cut the Filo sheets to size (save offcuts) and then place the tin sized sheets in between two slightly damp kitchen towels.
Note - This will help keep the Filo from drying out and breaking while you assemble the Baklava.
To assemble the Baklava, gently take one sheet of Filo and place it in the tin. Brush the top of the Filo sheet with more melted Ghee.
")
Tip - If you have less sheets in your pack, use some of the offcuts to create a layer.
Repeat this process, layering and buttering each sheet, until you've used half of the filo sheets.
Note - It's totally fine if the filo sheet tears, just assemble it back together and top with the next sheet.
Step 5 - Sprinkle the Nuts on the middle layer.
Now sprinkle over the Roast Nuts spreading it all over the Filo pastry edge to edge. You can also save some and sprinkle them between the remaining layers if you like.
")
Step 6 - Continue Assembling the Baklava
Place a sheet of Filo on top of the Nuts and continue to layer the Filo Pastry with Ghee between each layer until they are all used up.
Step 7 - Cut the Baklava into diamonds or squares and finish assembly
Heat the oven to 200 C/ 390 F/Gas Mark 6.
")
Do not brush the final layer. Gently press the Baklava down with your hands to squish the layers together and compress together to release air pockets.
Use a sharp knife to cut the Baklavas into diamond shapes or squares. You can make the Diamonds as big or as small as you would like.
Brush the top layer with a good amount of Ghee/clarified Butter.
Step 8 - Bake, Cool and add the Syrup
Bake in the oven for 15 minutes and then reduce the heat down to 180c/350f/Gas mark 4. Bake for 35-45 minutes or until the top layer is golden brown.
Take the baklava out of the oven and after 2-3 minutes, pour the cooled milky syrup all over the baklava. It will sizzle. Let it sit at room temperature for at least 1 hour and then place in the fridge for a few hours or overnight.
")
")
Step 9 - Top with Chocolate and serve
Once the Baklava has cooled, grate over some Chocolate or dust over some Cocoa Powder. Add some ground Pistachios and serve.
")
Cold Milk Baklava (Soguk Baklava) Recipe Notes and Tips
Filo pastry: If there are less sheets in your pack of Filo, use offcuts to create sheets.
Tearing: If the pastry tears, you can easily just reassemble it and use it anyway. It won't affect the flavour or look.
Chop the nuts coarsely: You want some texture so they are nice and crunchy. You will still get an even layer once the Nuts are compressed together and they will soak all the syrup up beautifully.
Make the Syrup first and then let it cool: Cool Syrup and Hot Baklava means you get crispy pastry rather then soggy.
Use plenty of Ghee: I use plenty of Ghee in this recipe. Many recipes use much less but I feel like the Ghee doesn't quite coat all the layers of filo properly. If you feel like this is too much Ghee, you can reduce it by half max.
Cut the Baklava before baking: It is far easier to cut before it goes into the Oven.
Use Fresh Filo: Fresh Filo is best in this recipe but frozen filo also works. Just makes sure that you thaw it in the fridge overnight. Otherwise it tears much more easily and is less pliable.
Leave in the fridge overnight: Let the Baklava chill in the fridge overnight so it fully absorbs all the Milk.
Variations
Try other flavours - Add some Rose Water, Honey or Orange Blossom Water to the Milk whilst it is heating up. You could also add Cocoa Powder for a fully chocolate cold milk Baklava. I feel like I have just given myself another job and this recipe may be coming soon!
Nut options - I use Pistachio in this recipe. You can use Walnuts or use a combination of both.
Storage
This Baklava keeps well for up to 3 days at room temperature and up to 7 days when stored in an airtight container or in the dish it was baked in, in the fridge.
If storing in an airtight container, make sure that it is in a single layer, so it does not become soggy. Cold Milk Baklava is meant to be eaten cold so storing it in the fridge is part of the deal!
Note - I do not recommend freezing it.
Make ahead
You can make baklava up to 12 hours in advance. Store in the fridge until you're ready to serve.
Serving Suggestions
Serve Cold Milk Baklava straight from the fridge, topped with a sprinkle of crushed pistachios, grated chocolate or cocoa powder. It's dreamy with a cup of cardamom chai or iced Turkish coffee.
More Recipes like this:
Turkish Chocolate Pistachio Baklava
Adana Kebab - Turkish Lamb Kebabs
Easy Homemade Turkish Chicken Doner Kebab
Tavuk Sis - Turkish Chicken Shish Kebab
Menemen with Beyaz Peynir or Feta - Turkish Scrambled Eggs
Rate and Leave a Comment
Did you make this recipe? i'd love to hear about it! did you try any variations? if you loved this recipe/tried any variations/have some top tips, please comment below. Your reviews make our day and your tips help others to find our recipes and enjoy them too! you can also follow us on instagram and subscribe to our newsletter to get our latest recipes.
📖 Recipe

Cold Milk Baklava (Soguk Baklava)
Ingredients
Milk Syrup
- 400 ml Milk Full Fat
- 100 ml Double Cream
- 450 g Sugar Caster or Granulated
Nuts
- 400 g Pistachios
- ½ -1 teaspoon Ground Cinnamon
- ¼ - ½ teaspoon Ground Cardamom
- Pinch Salt
Ghee
- 400 g Ghee melted, you may need more
Filo
- 500 g Filo Pastry About 25 Sheets, thawed if frozen
Toppings
- 50 - 75 g Milk Chocolate grated or 2 tablespoon Cocoa Powder sieved
- 2 tablespoon Ground Pistachios
Instructions
- Step 1 - Make the simple syrupPlace the sugar, milk and cream in a pot/saucepan. (I also sometimes add ground Cinnamon and Cardamom at this stage).Bring to a boil over a medium high heat. Once it comes to a simmer, lower the heat to medium and simmer for 15 minutes until it thickens slightly. Set the syrup aside to cool completely.Note - The cooled syrup can be made up to 2 days in advance and stored in the fridge.
- Step 2 - Prepare the filling (Roast the Nuts and make the Nut Mixture)Spread the Pistachio Nuts on to a baking sheet/tray and roast in the oven for 25 minutes at 180c/350f/Gas Mark 4. Then add to the bowl of a food processor and blend to a coarse crumb. Transfer to a large bowl and stir in Cinnamon powder, Cardamom powder and Salt. Mix well to fully combine.
- Step 3 - Melt the Ghee (only necessary in Winter)Add Ghee to a bowl and place in the microwave. Warm in 10 second bursts and stir with a spoon.
- Step 4 - Begin to assemble the first few layers of the BaklavaBrush a 9 x 13 inchbaking tin with some of the Ghee.Remove the thawed Filo/Phyllo pastry from the packaging and unroll onto a clean surface. Using the tin as a guide, cut the Filo sheets to size (save offcuts) and then place the tin sized sheets in between two slightly damp kitchen towels.Note - This will help keep the Filo from drying out and breaking while you assemble the Baklava.To assemble the Baklava, gently take one sheet of Filo and place it in the tin. Brush the top of the Filo sheet with more melted Ghee.Tip - If you have less sheets in your pack, use some of the offcuts to create a layer.Repeat this process, layering and buttering each sheet, until you've used half of the filo sheets.Note - It's totally fine if the filo sheet tears, just assemble it back together and top with the next sheet.
- Step 5 - Sprinkle the Nuts on the middle layer.Now sprinkle over the Roast Nuts spreading it all over the Filo pastry edge to edge. You can also save some and sprinkle them between the remaining layers if you like.
- Step 6 - Continue Assembling the BaklavaPlace a sheet of Filo on top of the Nuts and continue to layer the Filo Pastry with Ghee between each layer until they are all used up.
- Step 7 - Cut the Baklava into diamonds or squares and finish assemblyPreheat the oven to 200 C/ 390 F/Gas Mark 6.Do not brush the final layer. Gently press the Baklava down with your hands to squish the layers together and compress together to release air pockets. Use a sharp knife to cut the Baklava into diamond shapes or squares. You can make the Diamonds as big or as small as you would like.Brush the top layer with a good amount of Ghee/clarified Butter.
- Step 8 - Bake, Cool and add SyrupBake in the oven for 15 minutes and then reduce the heat down to 180c/350f/Gas mark 4. Bake for 35-45 minutes or until the top layer is golden brown. Take the baklava out of the oven and after 2-3 minutes, pour the cooled milky syrup all over the baklava. It will sizzle. Let it sit at room temperature for at least 1 hour and then place in the fridge for for a few hours or overnight.
- Step 9 - Top with Chocolate and serveOnce the Baklava has cooled, grate over some Chocolate or dust over some Cocoa Powder. Add some ground Pistachios and serve.
Notes
How to handle Filo pastry
Get Fresh Filo - Get fresh Filo pastry from the fridge section rather then the freezer section. It is easier to handle because there's no need to thaw it which makes it more pliable and less likely to get soggy. If you do get frozen, leave it in the fridge overnight to defrost slowly. In both case, take it out of the fridge 30 minutes beforehand.Keep the pastry covered whilst layering - cover with a slightly damp tea towel to ensure it doesn't dry out.
Handle gently - Use a gentle touch because it does tear easily.
Arifa says
These were unreal. We made them for a family picnic. I love the suggestion of a full chocolate version. Please make it 😌
Safira says
So glad you liked them. I'm on on it!