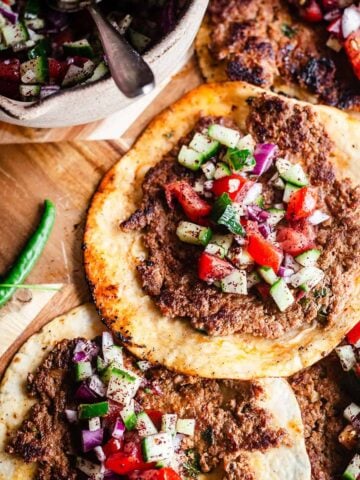
Khachapuri is a traditional Georgian cheese bread made from soft dough filled with cheese and baked until golden. This Adjarian-style version is shaped like a canoe, with a molten cheese centre that is finished with a runny egg yolk and butter just before serving. Khachapuri originates from Georgia, a country in the South Caucasus region at the crossroads of Eastern Europe and Western Asia.
")
Whilst there are many regional variations throughout Georgia, Adjarian Khachapuri is perhaps the most recognisable. The combination of freshly baked bread and rich cheese filling makes it one of the country's most beloved dishes.
Read more: Khachapuri (Georgian Cheese Bread)Traditional Khachapuri is often made using Georgian cheeses such as Sulguni and Imeruli. As these can be difficult to source outside Georgia, this recipe uses mozzarella, feta, ricotta and Grana Padano to create a similarly creamy, salty and beautifully stretchy filling using ingredients that are much easier to find.
I've also included my preferred shaping method, which involves sealing the cheese inside the dough before turning it over and slicing it open. It creates a neat canoe-shaped Khachapuri every time and helps keep the filling exactly where it should be.
Serve it straight from the oven whilst the cheese is still bubbling, stir the egg yolk and butter through the centre, and tear off pieces of bread to dip into the molten filling.
Jump to:
What is Khachapuri?
Khachapuri is one of Georgia's most iconic dishes and is often considered the country's national bread.
The name comes from the Georgian words khacho (curds or cheese) and puri (bread). Whilst there are many regional variations throughout Georgia, Adjarian Khachapuri is perhaps the most recognisable. Shaped like a boat, it is filled with cheese and baked until golden before being finished with an egg and butter.
The result is a rich, comforting bread with a crisp crust, molten cheese centre and silky egg that is stirred into the filling just before eating.
Traditionally, pieces of the warm crust are torn away and dipped into the cheesy centre.
Whilst cheese-filled Adjarian Khachapuri is the most famous version, many regional variations include herbs, spinach, Swiss chard, potatoes or different combinations of local Georgian cheeses.
Why You'll Love This Recipe
- Soft homemade bread dough with a chewy crust
- Rich, creamy and cheesy filling
- Easier shaping method than traditional recipes
- Perfect for sharing
- Great introduction to Georgian cuisine
- Uses easy-to-find ingredients
- Ideal for brunch, lunch or dinner
Ingredient Notes
Milk - Milk creates a softer, richer dough than water alone. It helps produce the tender texture that makes Khachapuri so irresistible.
Butter - Butter enriches the dough and helps create a soft crumb and beautifully golden crust. It also forms the base of the garlic butter brushed over the bread after baking.
Sugar - A small amount of sugar helps feed the yeast and encourages browning during baking.
Fast-Action Yeast - Fast-action yeast gives the dough its rise and airy texture. It can be added directly to the flour, making it ideal for quick and easy bread recipes.
Plain Flour - Whilst bread flour is often used in enriched doughs, plain flour works beautifully here, producing a soft and tender Khachapuri with just the right amount of chew.
Mozzarella - Mozzarella provides the signature cheese pull and creates the wonderfully molten centre that Khachapuri is known for.
Ricotta - Ricotta keeps the filling light and creamy and balances the saltier cheeses.
Feta - Feta adds tanginess and saltiness, helping create a more complex cheese filling.
Grana Padano - Grana Padano contributes a savoury, nutty flavour and adds depth to the filling. It helps recreate some of the complexity found in traditional Georgian cheeses.
Garlic - Garlic runs throughout this recipe, adding warmth and savoury flavour to both the cheese filling and the garlic butter finish.
Egg - An egg mixed into the filling helps bind the cheeses together and creates a smoother texture once baked.
Aleppo Pepper - Aleppo pepper adds gentle warmth and a subtle fruity heat without overpowering the cheese.
Dried Parsley - Dried parsley brings a subtle herbaceous flavour that complements the rich filling.
Egg Wash - Brushing the dough with egg wash before baking gives the Khachapuri its glossy, golden finish.
Garlic Butter - The garlic butter brushed over the hot bread after baking adds flavour, shine and extra richness. Don't skip it, it makes a huge difference.
Eggs (for Finishing) - The egg added towards the end of baking is one of the defining features of Adjarian Khachapuri. When stirred into the hot cheese filling, it creates a rich and silky sauce.
Butter (for Finishing) - A small knob of butter melted into the centre is traditional and adds the final layer of richness before serving.
How to Make Khachapuri
Step 1 - Make the Dough
Heat the milk and butter together in a small saucepan or microwave until the butter has melted. In a large bowl, combine the sugar and salt. Pour over the warm milk mixture and stir. Leave to cool until just warm to the touch. Add the flour and yeast and mix until a rough dough forms. Cover and leave to rest for 10 minutes. Knead the dough for 8 - 10 minutes by hand, or 5-6 minutes in a stand mixer, until smooth and elastic. Transfer to a lightly greased bowl, cover and leave to rise for 1-1½ hours, or until doubled in size.
")
Step 2 - Make the Filling
Whilst the dough rises, combine the mozzarella, ricotta, feta, Grana Padano, garlic, egg, salt, pepper, dried parsley and Aleppo pepper in a large bowl.
Step 3 - Divide the Dough
Line two baking trays with baking paper. Transfer the dough to a lightly floured surface and divide into 4 equal portions. Shape each portion into a ball and leave to rest for 15 - 20 minutes. This makes the dough easier to roll out.
Step 4 - Roll the Dough
Roll each piece of dough into a large oval about 20-25 cm.
")
Step 5 - Add the Filling
Spread the cheese filling down the centre of the dough, leaving a border around the edges.
")
Step 6 - Seal the Dough
Bring the long sides of the dough up and over the filling, enclosing it completely.
Pinch the seam closed and seal the ends to create a canoe-shaped parcel.
")
")
Step 7 - Turn Over
Carefully flip the dough over so the seam sits underneath.
Gently shape it into a neat canoe or boat shape.
")
Step 8 - Slice Open
Using a sharp knife, cut a long slit down the centre of the dough. Gently pull the cut edges apart to reveal the cheese filling underneath. You should now have the classic Khachapuri shape with raised sides and a generous cheese-filled centre.
")
")
Step 9 - Bake
Transfer to a lined baking tray and brush the dough with egg wash. Bake for 20-25 minutes, until the dough is puffed, lightly golden and the cheese is bubbling.
Step 10 - Add the Egg
Remove from the oven, smoosh the cheese in the middle down a little to create an indent and carefully crack a small egg into the centre of each Khachapuri. Return to the oven for a further 5-10 minutes, until the egg white has just set and the yolk is still soft and runny. Be sure to keep an eye on them during this stage, as every oven behaves differently and the eggs can go from perfectly runny to fully cooked very quickly.
Step 11 - Make the Garlic Butter
Whilst the Khachapuri bakes, mix together the melted butter with the remaining ingredients.
Step 12 - Add Butter and serve
Add a generous knob of butter to the hot cheese. Scatter over fresh herbs if desired. Serve immediately whilst hot.
")
")
Tips for the Best Khachapuri
Use Good Quality Cheese
The filling is the star of the dish, so use the best cheese you can find.
Keep the Egg Yolk Runny
The yolk creates the signature silky sauce when stirred through the cheese and butter.
Don't Overfill
A generous filling is important, but too much can make shaping difficult.
Eat Fresh from the Oven
Khachapuri is at its absolute best whilst the cheese is still molten and stretchy.
Variations
Spinach and Cheese Khachapuri
Add 150-200g wilted spinach to the cheese filling. Squeeze out any excess moisture before mixing it through.
Swiss Chard Khachapuri
Swiss chard is commonly used throughout the Caucasus region and pairs beautifully with the rich cheese filling. Finely chop the leaves, sauté briefly with garlic and fold into the cheese mixture.
Spicy Garlic Khachapuri
This recipe already includes garlic and Aleppo pepper in the filling, giving it a subtle warmth and extra savoury flavour. For more heat, add extra Aleppo pepper or a pinch of chilli flakes before baking.
Breakfast Khachapuri
Top with turkey bacon, sucuk or sautéed mushrooms before adding the egg.
Khachapuri with Sulguni
If you can source Sulguni cheese, substitute some of the mozzarella for a more traditional Georgian flavour.
Storage
Khachapuri is best enjoyed fresh from the oven.
Any leftovers can be stored in an airtight container in the fridge for up to 2 days and reheated in the oven until warmed through.
Frequently Asked Questions
Where Does Khachapuri Come From?
Khachapuri originates from Georgia, a country located at the crossroads of Eastern Europe and Western Asia. It is one of the country's most beloved and recognisable dishes.
What Does Khachapuri Mean?
The name comes from the Georgian words khacho (cheese or curds) and puri (bread).
Can I Make the Dough Ahead?
Yes. The dough can be made the day before and left to rise slowly in the fridge overnight.
What Cheese is Traditionally Used in Khachapuri?
Traditional Georgian cheeses such as Sulguni and Imeruli are most commonly used. Since they can be difficult to find outside Georgia, mozzarella, feta, ricotta and Grana Padano make an excellent substitute.
More Bread Recipes You May Like:
Turkish Pide (Minced Meat and Cheese) - Turkish Pizza
Turkish Simit - Turkish Sesame Bagel Bread
Musakhan (Palestinian Sumac Chicken on Taboon Bread)
Did you make this recipe? i'd love to hear about it! did you try any variations? if you loved this recipe/tried any variations/have some top tips, please comment below. Your reviews make our day and your tips help others to find our recipes and enjoy them too! you can also follow us on instagram and subscribe to our newsletter to get our latest recipes.
📖 Recipe

Khachapuri (Georgian Cheese Bread)
Ingredients
For the Dough
- 220 g Milk
- 45 b Butter
- 1 ½ teaspoon Sugar
- 1 ½ teaspoon Salt
- 2 teaspoon Fast Action Dried Yeast
- 325 g Plain Flour
For the Cheese Filling
- 235 g Mozarella Grated
- 150 g Ricotta
- 60 g Feta Crumbled
- 2 tablespoon Grana Padano Finely grated
- 2-3 Garlic Cloves Crushed
- 1 Egg Optional
- ¼ - ½ teaspoon Salt
- ½ teaspoon Ground Black Pepper
- 1 teaspoon Dried Parsley
- 1 teaspoon Aleppo Pepper
For the Egg Wash
- 1 Egg
- 1 teaspoon Milk
For the Garlic Butter Baste
- 125 g Butter Melted
- 2 teaspoon Garlic crushed, or 1 teaspoon Garlic Granules
- Pinch Salt and Pepper
- Pinch Dry Parsley
Topping
- 4 Eggs
- 4 teaspoon Butter Optional, this is traditional but not necessary given the Garlic Butter Baste
Instructions
- Step 1 - Make the Dough - Heat the milk and butter together in a small saucepan or microwave until the butter has melted. In a large bowl, combine the sugar and salt. Pour over the warm milk mixture and stir. Leave to cool until just warm to the touch. Add the flour and yeast and mix until a rough dough forms. Cover and leave to rest for 10 minutes. Knead the dough for 8 - 10 minutes by hand, or 5 - 6 minutes in a stand mixer, until smooth and elastic.Transfer to a lightly greased bowl, cover and leave to rise for 1-1½ hours, or until doubled in size.
- Step 2 - Make the Filling - Whilst the dough rises, combine the mozzarella, ricotta, feta, Grana Padano, garlic, egg, salt, pepper, dried parsley and Aleppo pepper in a large bowl.
- Step 3 - Divide the Dough - Line two baking trays with baking paper. Transfer the dough to a lightly floured surface and divide into 4 equal portions. Shape each portion into a ball and leave to rest for 15 - 20 minutes. This makes the dough easier to roll out.
- Step 4 - Roll the Dough - Roll each piece of dough into a large oval about 20-25 cm.
- Step 5 - Add the Filling - Spread the cheese filling down the centre of the dough, leaving a border around the edges.
- Step 6 - Seal the Dough - Bring the long sides of the dough up and over the filling, enclosing it completely. Pinch the seam closed and seal the ends to create a canoe-shaped parcel.
- Step 7 - Turn Over - Carefully flip the dough over so the seam sits underneath. Gently shape it into a neat canoe or boat shape.
- Step 8 - Slice Open - Using a sharp knife, cut a long slit down the centre of the dough. Gently pull the cut edges apart to reveal the cheese filling underneath. You should now have the classic Khachapuri shape with raised sides and a generous cheese-filled centre.
- Step 9 - Bake - Transfer to a lined baking tray and brush the dough with egg wash. Bake for 20-25 minutes, until the dough is puffed, lightly golden and the cheese is bubbling.
- Step 10 - Add the Egg - Remove from the oven, smoosh the cheese in the middle down a little to create an indent and carefully crack a small egg into the centre of each Khachapuri. Return to the oven for a further 5-10 minutes, until the egg white has just set and the yolk is still soft and runny. Be sure to keep an eye on them during this stage, as every oven behaves differently and the eggs can go from perfectly runny to fully cooked very quickly.
- Step 11 - Make the Garlic Butter- Whilst the Khachapuri bakes, mix together the melted butter, garlic, salt, pepper and dry parsley and brush the hot crust generously with the garlic butter.
- Step 12 - Add Butter (Optional) and Serve - Add a generous knob of butter to the hot cheese. Scatter over fresh herbs if desired. Serve immediately whilst hot.
Notes
Tips for the Best Khachapuri
Use Good Quality CheeseThe filling is the star of the dish, so use the best cheese you can find.
Keep the Egg Yolk Runny
The yolk creates the signature silky sauce when stirred through the cheese and butter.
Don't Overfill
A generous filling is important, but too much can make shaping difficult.
Eat Fresh from the Oven
Khachapuri is at its absolute best whilst the cheese is still molten and stretchy.
Variations
Spinach and Cheese Khachapuri - Add 150–200g wilted spinach to the cheese filling. Squeeze out any excess moisture before mixing it through. Swiss Chard Khachapuri - Swiss chard is commonly used throughout the Caucasus region and pairs beautifully with the rich cheese filling. Finely chop the leaves, sauté briefly with garlic and fold into the cheese mixture. Spicy Garlic Khachapuri - This recipe already includes garlic and Aleppo pepper in the filling, giving it a subtle warmth and extra savoury flavour. For more heat, add extra Aleppo pepper or a pinch of chilli flakes before baking. Breakfast Khachapuri - Top with turkey bacon, sucuk or sautéed mushrooms before adding the egg. Khachapuri with Sulguni - If you can source Sulguni cheese, substitute some of the mozzarella for a more traditional Georgian flavour.Storage
Khachapuri is best enjoyed fresh from the oven.Any leftovers can be stored in an airtight container in the fridge for up to 2 days and reheated in the oven until warmed through.
Frequently Asked Questions
Where Does Khachapuri Come From?Khachapuri originates from Georgia, a country located at the crossroads of Eastern Europe and Western Asia. It is one of the country's most beloved and recognisable dishes. What Does Khachapuri Mean?
The name comes from the Georgian words khacho (cheese or curds) and puri (bread). Can I Make the Dough Ahead?
Yes. The dough can be made the day before and left to rise slowly in the fridge overnight. What Cheese is Traditionally Used in Khachapuri?
Traditional Georgian cheeses such as Sulguni and Imeruli are most commonly used. Since they can be difficult to find outside Georgia, mozzarella, feta, ricotta and Grana Padano make an excellent substitute.


Grace says
This was incredble
Safira says
So happy you enjoyed it. Thank you for the feedback!