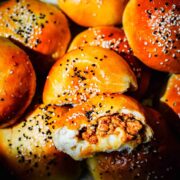
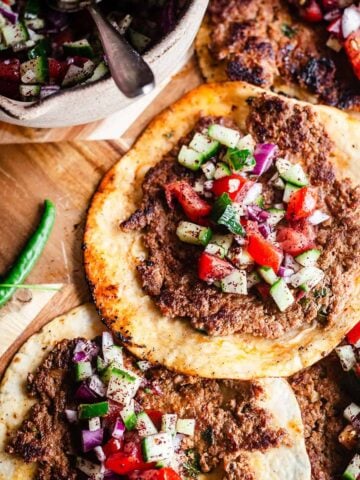
Chicken Stuffed Milk Buns - This Stuffed Milk Bun Recipe is delicious. The ultimate portable picnic/lunchbox snack! The recipe is similar to the recipe I used in The BEST Burger Buns recipe but it has been amended slightly to make the dough suitable to carry a heavy filling. The Buns are soft, fluffy and DIVINE and are stuffed with a simple spiced filling made using Chicken Breast, Spices and Herbs.

You can also use leftover Chicken. Just make sure to shred it or cut into small pieces. As long as your mixture isn't too wet and has cooled down COMPLETELY, it will work beautifully. Once the Buns are cooked, we brush them with Garlic Butter for another layer of flavour.
Chicken Stuffed Milk Buns
I first made these buns immediately after Ramadan. I wanted to combine my Chicken Bun recipe with Japanese Milk Buns to see if it would work.
I sent them to my in laws house for my brother in law thinking he would be the only person who would enjoy them but I later found out that my Mother in Law absolutely loved them and she requested the recipe immediately which is a complement and a half because she is a great cook.
Stuffed Milk Bun Recipe
As mentioned the stuffing recipe isn't important. I wanted to provide a recipe that would stand up to a stuffing but remain soft. You can use ANY filling!
The super soft burger buns are fun and easy to make. They use the Tangzhong method, which gives a super soft bun which stays soft for days. They really are the softest, lightest, fluffiest buns ever! A million times better then store brought buns and so easy to make.
I have made several other buns using this method and I have a recipe coming for each of them soon. I have made these Milk Buns as Dinner Rolls, Stuffed with fillings and Sweet Rolls.
If you make these buns, please do share and more importantly rate and leave a comment. I have been working on perfecting this recipe for a really really long time. On the dough itself - since January.
Ingredients Needed
Here's what you will need to make this Recipe (Full quantities can be found in the recipe card at the bottom of the page:
Filling
Chicken Breast - Use either tenders or Breast.
Garlic Paste - Use fresh, a paste or a powder
Lemon juice
Spices - Salt, Cumin Powder, Onion powder or Old Bay Seasoning, Smoked Paprika,Cayenne Pepper, Chilli Flakes - I used Chipotle Chilli Flakes but any will work
Vegetable Oil - or Ghee to cook the Chicken.
Buns
For the Tangzhoug - Strong Bread Flour and Milk. Use whole Milk, not skimmed!
Other -
- Strong Bread Flour
- Instant Yeast or Active dry yeast
- Large Egg
- Sugar
- Salt
- Milk
- Softened Butter
To finish the Buns:
Egg wash - Egg and Milk gives a golden look to the buns.
Sesame and Nigella Seeds - Add flavour and texture.
Garlic Butter - Made with Garlic Powder or Paste and Butter.
How to make them
Make the Filling
Marinade Chicken in all ingredients.
Heat a pan over high heat and add the Chicken. Cook for 15 - 20 minutes or until the Chicken is cooked through and most of the water has evaporated, and then set aside.
Make the Tangzhoug
Combine Milk and Flour in a small saucepan and mix together over low heat. Stir until thickened to a paste and then leave to cool.

Bloom the Yeast
If you are using Active Dry Yeast, bloom it in warm Milk for 10 minutes.
Mix the Flour, Sugar and Salt and whisk together.
Add the Tangzhoug and mix for 2 minutes on low speed.
Add Egg and mix again till combined.
Add Yeast mixture and whisk for 2 - 3 minutes.
Once fully incorporated, knead slowly for a further for 15 - 20 minutes adding the butter slowly. The dough will start pulling away from the sides of the bowl and making a slapping sound and the dough will looks smooth.

Place a damp kitchen towel directly over the bowl and allow it to rest until it has doubled in size. Around 1.5 - 2 hours.
Shape and fill the Buns
Line a 9 x 13 inch tin if you don't mind them being joined together. I used 2, 9 x 13 tins because I wanted full rounded buns.
Punch the dough down, and place on a lightly floured work surface.


Cut into equal pieces . (Weighing them helps - Mine were around 70g each). You can make them whatever size you like.
To shape, gently flatten each piece of dough on a floured surface with a rolling pin until about 8 - 9 cm in diameter.
Add cooled Chicken filling. I used around 2 tablespoon per Bun.
NOTE - THE DOUGH SHOULD BE ROLLED OUT MUCH MORE THEN THIS!

Pull up the edges of the dough, pinching it together in the middle. Repeat until the ball is sealed.
Then cup your hand over the ball and gently move in a circular motion until the bun is smooth. Place seam side down on a lined tray.
Repeat until all the Buns are filled.

Cover and leave in a warm place.
Now let the rolls rise again for 30 minutes.
Bake and Serve
In the last 20 minutes, preheat the oven to GM 5, 215 C for 15 - 20 minutes and get the Garlic Butter ready.
Brush with Egg Wash and top with Sesame and Nigella Seeds.
Bake for 15 - 20 minutes. Transfer to a wire rack to cool completely.


Tips and Tricks
Yeast
Instant yeast and Active Dry Yeast are interchangeable at a 1:1 ratio.
However, active dry yeast needs to be bloomed with liquid before continuing with the recipe and may take longer to rise.
What I do when using active dry yeast is add the yeast to part of the milk (milk should be warm) from the recipe and let it stand for a bit before continuing with the recipe. In this recipe if using Active Dry Yeast, I bloom the yeast in all the milk rather then part.
Dough
This dough is meant to be sticky so avoid adding any extra flour. It will look wet and sticky but it will come together eventually as it is kneaded.
Adding extra will create a dense chewy bun instead of the light fluffy milk/brioche-style bun we want.
If the dough doesn't feel like it's coming together at all, let it rest for about 10 minutes before continuing kneading to relax the gluten. The Dough will look shiny and will be softer then a normal dough.
Window Pane Test
Once you can stretch the dough with your fingers without it tearing, it is ready. Enough gluten has developed in the dough for it to begin proofing. This is called the windowpane test. If the dough tears, it means you need to knead a little more.
Another way to check if the Dough is ready
Once you make Bread for long enough, you learn what is normal and what isn't.
The best way to check it is ready to bake is to poke it gently. If it springs back immediately, it is not ready. If your finger leaves an indentation mark which springs back slowly and slightly, then it is ready to bake.
Filling
If you have a little too much Chicken, it is better to leave some rather then over fill the buns.
Make Ahead
To make the dough ahead of time, let the first rise of the dough to happen in the fridge overnight. Let the dough come to room temperature (about 15 - 20 minutes) before knocking the air out of it and shaping into buns.
FAQs
Do I have to use Bread Flour?
Yes in this recipe the Strong Bread Flour is needed!
Can the dough be kneaded by hand?
It is far easier to knead this with a stand mixer with a dough hook attachment. The dough is quite sticky and takes some kneading to come together. If you prefer to knead by hand, you will need to knead a lot longer.
How do I know when the Buns are ready?
The buns will turn golden brown and will sound hollow when tapped at the bottom.
Variations
You can change this recipe up by changing the filling:
- Add some Mozzarella Cheese or chunks of Babybel in the middle for the cheesiest garlic buns!
- Add a mince filling.
- Add some Cheese in with the Chicken.
More Bread Recipes:
Korean Garlic Bread With Cream Cheese
Turkish Simit - Turkish Sesame Bagel Bread
Rate and Leave a Comment
did you make this recipe? i'd love to hear about it! did you try any variations? if you loved this recipe/tried any variations/have some top tips, please comment below. Your reviews make our day and your tips help others to find our recipes and enjoy them too! you can also follow us on instagram and subscribe to our newsletter to get our latest recipes.
📖 Recipe
Chicken Stuffed Milk Buns
Ingredients
Chicken Filling
- 2 tablespoon Oil
- 1 teaspoon Garlic Paste
- ¾ teaspoon Smoked Paprika
- 1 teaspoon Cayenne Pepper
- ¾ teaspoon Chilli Flakes
- ¾ tablespoon Onion Powder or Old Bay Seasoning
- 1 ½ teaspoon Cumin Powder
- Salt and Pepper
- 3 tablespoon Lemon Juice
- 500 g Chicken Breast diced into small pieces
Tangzhoug
- 100 g Milk
- 20 g Strong Bread Flour
Dough
- 400 g Strong Bread Flour
- 7 g Instant Yeast or Active Dry Yeast
- 30 g Caster Sugar
- 1 Egg
- 160 g Milk
- 7 g Salt
- 55 g Butter Room Temperature
Egg Wash and Topping
- 1 Egg
- 1 tablespoon Milk
- 1 teaspoon Sesame Seeds
- 1 teaspoon Nigella Seeds
Garlic Butter
- 6 tablespoon Butter Melted
- ½ teaspoon Garlic Granules
Instructions
Chicken FIlling
- Marinade Chicken in all ingredients.
- Heat a pan over high heat and add the Chicken. Cook for 15 - 20 minutes or until the Chicken is cooked through and most of the water has evaporated, and then set aside.
Tangzhoug
- Add the flour and milk to a pan over medium high heat and whisk continuously till it thickens. Scrape into a bowl and leave to cool.
Dough
- If you are using Active Dry Yeast, bloom it in warm Milk for 10 minutes.
- Mix the Flour, Sugar and Salt and whisk together.
- Add the Tangzhoug and mix for 2 minutes on low speed. Add Egg and mix again till combined. Add Yeast mixture and whisk for 2 - 3 minutes.
- Once fully incorporated, knead slowly for a further for 15 - 20 minutes adding the butter slowly. The dough will start pulling away from the sides of the bowl and making a slapping sound and the dough will looks smooth.
- Gather dough up and add to a greased bowl. Cover with damp cloth and leave to prove for 1.5 hours.
- Lightly flour your work surface and divide dough into equal pieces - around 70g. (12 buns).
- Roll each peice out flat and fill with 2 tablespoon cooled Chicken mixture.
- Line a 9 x 13 inch tin - if you don't mind them being joined together then 1 tin is sufficient. I used 2, 9 x 13 tins because I wanted full rounded buns. Add the buns to the tins. Cover lightly with greased cling film and allow to rise for 30 minutes.
- Make the egg wash by whisking the egg and milk together. Paint over the buns and sprinkle with Sesame and Nigella Seeds.
Garlic Butter
- Make the Garlic Butter by combining melted Butter and Garlic Granules in a bowl and mixing togeher.
Bake
- Bake at GM 5, 190 °C for 15 - 20 minutes.
- Brush with Garlic Butter. Remove to a wire rack to cool completely.
Notes
Tips and Tricks
YeastInstant yeast and Active Dry Yeast are interchangeable at a 1:1 ratio. However, active dry yeast needs to be bloomed with liquid before continuing with the recipe and may take longer to rise.
What I do when using active dry yeast is add the yeast to part of the milk (milk should be warm) from the recipe and let it stand for a bit before continuing with the recipe. In this recipe if using Active Dry Yeast, I bloom the yeast in all the milk rather then part. Dough This dough is meant to be sticky so avoid adding any extra flour. It will look wet and sticky but it will come together eventually as it is kneaded. Adding extra will create a dense chewy bun instead of the light fluffy milk/brioche-style bun we want. If the dough doesn’t feel like it’s coming together at all, let it rest for about 10 minutes before continuing kneading to relax the gluten. The Dough will look shiny and will be softer then a normal dough. Window Pane Test Once you can stretch the dough with your fingers without it tearing, it is ready. Enough gluten has developed in the dough for it to begin proofing. This is called the windowpane test. If the dough tears, it means you need to knead a little more. Another way to check if the Dough is ready Once you make Bread for long enough, you learn what is normal and what isn’t. The best way to check it is ready to bake is to poke it gently. If it springs back immediately, it is not ready. If your finger leaves an indentation mark which springs back slowly and slightly, then it is ready to bake. Filling If you have a little too much Chicken, it is better to leave some rather then over fill the buns.
Make Ahead
To make the dough ahead of time, let the first rise of the dough to happen in the fridge overnight. Let the dough come to room temperature (about 15 - 20 minutes) before knocking the air out of it and shaping into buns.FAQs
Do I have to use Bread Flour? Yes in this recipe the Strong Bread Flour is needed! Can the dough be kneaded by hand? It is far easier to knead this with a stand mixer with a dough hook attachment. The dough is quite sticky and takes some kneading to come together. If you prefer to knead by hand, you will need to knead a lot longer. How do I know when the Buns are ready? The buns will turn golden brown and will sound hollow when tapped at the bottom.Variations
You can change this recipe up by changing the filling:- Add some Mozzarella Cheese or chunks of Babybel in the middle for the cheesiest garlic buns!
- Add a mince filling.
- Add some Cheese in with the Chicken.
Julia says
These were absolutely incredible! I stuffed mine with wild boar, caramelized onion, and sharp cheddar. The dough was perfect to work with and the final result was divine. Thanks!
Safira says
Thanks so much. I am so happy to read this. SOOOO glad you enjoyed them. 🙂
Carla says
Hello! How much water do you add to the tangzhoug? On your ingredient list for the tangzhoug, it only listed milk and bread flour. Yet on your instructions it says: “Add the water and milk to a pan over medium high heat and whisk continuously till it thickens.” The instructions mentioned water and yet omitted the bread flour. It’s a little bit confusing. Thank you for sharing your knowledge and any clarifications for my question.
Safira says
Hi Carla,
So sorry for the confusion. There is no water needed for the tangzhoug. Just the flour and milk. Have updated instructions. Thank you for letting me know.
Gabi says
I haven't finished baking everything but so far it's going well!
I do have one question however, in the ingredients for the dough there is 55g butter but nowhere in the recipe is it mentioned when to add it so I just used some of it to grease the dough and bowl after kneading it by hand.
I assume it may have been meant to be kneeded in but i was unsure at what point.
The chicken tastes very good with this spice mix though (I used thighs instead of breasts so it wouldn't go dry)
Safira says
Hi,
Thank you for your feedback. Lovely to hear that you enjoyed the chicken mixture.
I would love to know how the dough mixture and buns worked out? Apologies for the error re the butter.