THE BEST Lindt BROWNIES - Brownies with Lindor in the middle is like having the best chocolate melty pudding in brownie form. With this recipe you are guaranteed fudgy Brownies with a gooey middle.

Lindt Chocolatey Homemade Brownie
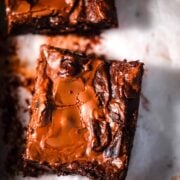
What better way to get a perfectly gooey Brownie with crispy edges, then to stud them with Lindor Chocolates? Trust me when I say that this is the PERFECT BROWNIE!
Brownies taste great with so many additions and are endlessly adaptable but with Lindor, they are incredible!
The wonderful thing about Brownies is that they are quick and easy to make.
What are Brownies?
Brownies are an American recipe for a chocolatey bake.
You can add all manner of fillings and toppings to Brownies such as chocolate chips, caramel, cream cheese, tinned or fry fruits, walnuts, pecans, peanuts, pretzels, chopped chocolate, biscuits, nutella, biscoff, tahini, fudge but let's be real, the Lindt ones are pretty special..aka the BEST!
Brownies are meant to be gooey/fudgy. This is achieved by adding very little flour to them as well as plenty of sugar.
ingredients in Lindt chocolate brownies recipe
You need basic ingredients to make this deliciously moist brownie. Here is what you will need:
Salted or Unsalted Butter
I use Salted. I know that many use Unsalted and then add a touch of Salt in the batter. You can do either.
Chocolate
I recommend a good quality dark chocolate/bittersweet chocolate that is in the region of 60% Cocoa Solids. In this recipe we use Lindt Chocolate Bars.
Plain Flour (All Purpose Flour) and Cocoa Powder
The ratio of this is very little compared to the wet ingredients and that is what makes them so good!
Plain Flour works best in this recipe. Self Raising Flour can't be substituted for Plain Flour in this recipe. Adding too much flour results in a cakey brownie.
Any Cocoa Powder can be used in this Recipe. Not Drinking Chocolate Powder though.
Vanilla Extract
Use a good Vanilla Bean paste or extract if you can find one. You can skip it too if you prefer but I love the flavour it adds.
Eggs
This adds structure. Helps to emulsify the ingredients and thickens the batter. Large Eggs are recommended. Any free range organic Eggs are perfect.
Light Brown Sugar and Caster Sugar
For moisture and crisp edges.
Lindor Truffles
These milk chocolateTruffles have a beautiful creamy middle and this in the middle of the Brownies, makes for the most delicious Creamy, Fudgy Brownie.
Salt
A pinch of any standard table salt, sea salt or Himalayan salt can be added into the batter. Or a small sprinkling of Maldon Salt can be added on top of the Brownies once baked.
how to make Lindt Lindor brownies
This is a recipe for all chocolate lovers. The full recipe can be found in the recipe card at the bottom of the page:
Pre heat oven to Gas Mark 5/190 C.
Line a square 9 inch square baking pan/tin with baking paper/parchment paper leaving some overhang to help lift them out later!
Melt Butter and Chocolate in a large mixing bowl over a medium saucepan of simmering water (double boiler) over medium low heat, making sure that the bottom of the bowl does not touch the water.

Beat Eggs, Vanilla and Sugar with an electric mixer in a large bowl or in a stand mixer till pale and voluminous. At least double in size! This is what makes fudgy brownies.

Stir in the melted Chocolate mixture slowly. If using a stand mixer, using a very low setting to mix in.

Sift in the dry ingredients - Plain Flour and Cocoa. Fold into the brownie mixture very gently.

Scrape brownie batter into prepared square pan/tin.

Add Lindt Truffles into the Brownie tin. I added 9.
Bake for 20 minutes. If you want thicker Brownie, increase the ingredients by a third and bake for 30-35 minutes.
Leave to cool completely before cutting.
[mv_video jsonLd="true" key="jar7yfequsre8iyn0vca" ratio="4:3" thumbnail="https://mediavine-res.cloudinary.com/v1703081520/p95wjjdtva30d187tyt9.jpg" title="The BEST Lindt Brownies"]
How to tell when Brownies are done
It can be tricky to tell when Brownies are done because the usual method of putting a skewer/cake tester into the middle and it coming out clean, doesn't apply here.
These Brownies especially with Lindor dotted throughout will have gooey middles especially when first out of the oven.
If they are done, the internal temperature should be 73 C/165 F.
That being said, after 30 minutes in the Oven, they will be ready anyway.
These Brownies, like most good Brownie recipes need cooling time to achieve the perfect fudgy texture.
Variations for this easy brownie recipe
Use other Lindor Truffle Flavours such as Salted Caramel in these Chocolatey Lindt Brownies.
Add a handful of Chocolate Chips or Nuts for more body.
Storage - How to store Brownies
Storage for Brownies is quite simple.
How to store Brownies in the fridge
These brownies keep well in the fridge in an airtight container or on the counter top (if you are in a cool-ish country) for a week.
If it is super hot where you are, they must be kept in the fridge or they will lose their structure.
How to store Brownies in the freezer
Brownies keep well in the freezer for up to 3 months in an airtight container or wrap in 2 layers of cling film followed by one layer of tin foil. Just make sure to label and date them!
To serve
Bring back to room temperature for 2 - 3 hours before serving. You can do this in the fridge or on the counter top.
Tips to make incredible Lindt Brownies
Fridge time
Keep them in the fridge and serve at room temperature or slightly warm in the microwave before eating. If you are in a colder country, the counter top is fine.
Chocolate
Use Dark Chocolate that is between 55 - 70% for best results.
Baking paper
Allow some overhang, to make it easier to lift the Brownies out of the tin and secure with clips on the sides
Use Room Temperature ingredients
Fridge cold ingredients (especially eggs and butter) may cause problems with the mixing of ingredients.
Wait for them to cool completely before serving
Let them cool completely before serving for best results and texture.
Ribbon Stage
When you are mixing the butter and sugar in Brownie recipes or most Cake recipes, it is important that the eggs and sugar are beaten together until they reach ribbon stage.
This means that the batter has become thick foamy, very pale, considerably more voluminous (double or tripled in volume) and will fall off into ribbons.
Meaning when you lift the whisk from the mixture, the batter should fall off in thick ribbons and these lines will stay on top of the batter, for a few moments before slowly disappearing.
Whisk for at least 5 minutes
Whisking eggs with sugar for at least 5 minutes gives the brownies some lift and makes them fluffier. See note re ribbon stage above.
Gentle Touch
Fold in dry ingredients gently so non of that air you just created gets knocked out.
How to serve
Brownies can be eaten by hand with a cup of your favourite beverage - such as tea, hot chocolate, warm milk or coffee. Or you can eat them with a spoon or fork served with a scoop of vanilla ice cream or a drizzle of cream.
More Recipes you may enjoy:
The BEST Homemade Dark Chocolate Brownies
Fudgy Triple Chocolate Brownies (Best Ever)
did you make this recipe? i'd love to hear about it! did you try any variations? if you loved this recipe/tried any variations/have some top tips, please comment below. please leave a 5-star🌟 rating below. you can also follow us on instagram and subscribe to our newsletter to get our latest recipes.
📖 Recipe
THE BEST Lindt BROWNIES
Ingredients
- 120 g Butter
- 200 g Dark Chocolate Lindor
- 2 Eggs
- 150 g Light Brown Sugar
- 50 g Caster Sugar
- 55 g Plain Flour
- 35 g Cocoa Powder
- 9 Lindor Truffles Milk Chocolate
Instructions
- Pre heat oven to Gas Mark 5/190 C.
- Line a square 9 inch square baking pan/tin with baking paper/parchment paper leaving some overhang to help lift them out later!
- Melt Butter and Chocolate in a large mixing bowl over a medium saucepan of simmering water (double boiler) over medium low heat, making sure that the bottom of the bowl does not touch the water.
- Beat Eggs, Vanilla and Sugar with an electric mixer in a large bowl or in a stand mixer till pale and voluminous. At least double in size! This is what makes fudgy brownies.
- Stir in the melted Chocolate mixture slowly. If using a stand mixer, use a very low setting to mix in.
- Sift in the dry ingredients - Plain Flour and Cocoa. Fold into the brownie mixture very gently.
- Scrape brownie batter into prepared square pan/tin. Add Lindt Truffles into the Brownie tin. I added 9.
- Bake for 20 minutes. If you want a thicker Brownie, increase the ingredients by a third and bake for 30-35 minutes.
- Leave to cool completely before cutting. Place in the fridge to set for at least 2 hours before serving.


Leave a Reply