I first came across Conchas or Concha Bread in a Mexican recipe book. Mexico has an array of sweet breads (Pan Dulce) but this one really stood out to me because of the colours and I just had to make it.

So 2 years later..(LOL), I made them. If you have followed me for a while, you know how long it takes me to actually make a recipe after I have seen it.
Mexican Conchas Recipe
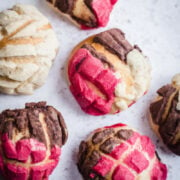
Conchas are a gorgeously sweet & soft bread with a white streusel topping.
The name for the bread comes from the topping that looks like the surface of a seashell. Concha means Shell in Spanish. The topping can be made in any colour but the popular colours are white, pink and brown (which is flavoured and coloured with cocoa).
Conches are consumed at any time of the day. I usually make a huge batch and take them out of the freezer as and when a craving for them comes up.
Easy Conchas Recipe
As with any bread recipe, for me the appeal is that they are easy to make. Yes they are time consuming but the recipe itself is easy.
What are Conchas made of
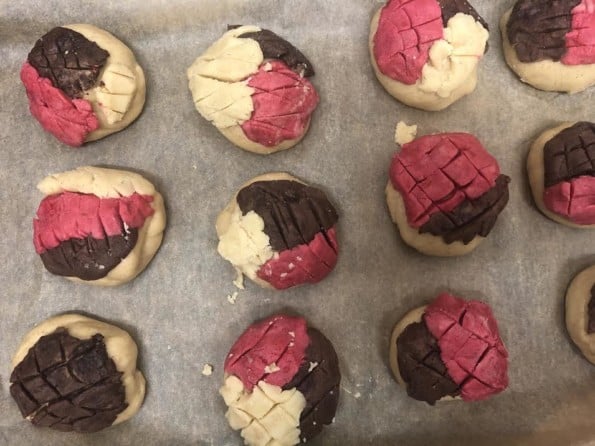
A concha has a soft enriched dough and it is topped with a sweet streusel topping A concha shaped press is usually pressed into the topping to form the shapes you normally see. I used a knife to score.
How to eat Conchas
You can eat them as they are or dip them in milk or hot chocolate.
Some people eat them warm, cut in half and spread refried beans on them whilst warm.
How to make Conchas
Bloom Yeast - As with any bread recipe, if using Dry Yeast or Dry Active Yeast, you will need to bloom it in the warm liquid from the recipe for about 10 to 15 minutes, before adding it to the rest of the ingredients. Add yeast to the luke warm evaporated milk and set aside.
Next add Plain flour or Bread Flour and sugar to the bowl of a stand mixer. Then add salt and yeast (with milk if bloomed beforehand) at opposite ends. Mix to combine.
Mix in the eggs and vanilla extract and slowly add the milk (if you haven't already added it with the yeast), in bit by bit, mixing in between.
Add the butter slowly and beat on medium/high for 10 - 15 minutes.

Place the dough on a floured surface and shape into a ball. Place in a greased bowl, cover with a damp cloth/cling film and rest in a warm place for 2 hours or until doubled in size.

Once the dough is ready, divide into 18 pieces. To shape the balls, lightly flour your hands and place over a ball of dough, then rotate your hands over the top to form a ball. Continue with remaining dough.


Place onto a lined tray and brush dough with butter or oil. This is an optional step but helps the streusel to remain in place.
To prepare the streusel topping, add sugar to the butter in a bowl and beat together using a spoon/whisk. Now add in the flour little by little and spice too if using. Set aside for later.
If making the Conchas in different colours, divide the dough in seperate bowls accordingly and add the cocoa powder to one mixture, leave 1 plain and add red food colouring to the final bowl, mixing each mixture well until combined.
To add the topping, flour your hands and divide the topping paste into 18 balls. Shape with your hands into a round disk and place on top of a ball of dough. Continue with remaining mixture. Use a knife to decorate as you wish or into the design of a traditional concha shape (seashell).

Now leave to rise in a warm place until they are almost double in size. Around 1.5 hours.
Bake in a preheated oven at 165C/Gas Mark 3 for 20 minutes, rotating midway.
Tips and Tricks for PERFECT Conchas
- You can use Plain Flour in this recipe but Bread Flour makes for softer bread in this recipe.
- If using Dry Active Yeast, you will need to prove yeast in the warm milk from the recipe for about 10 to 15 minutes, before adding it to the rest of the ingredients.
- Make sure that the yeast you're using has not expired.Check the the expiration date, or test the yeast in some warm water. If it froths after 5 minutes, it is fine to use.
- You can prove the dough in the fridge overnight.
How to freeze Conchas
You can freeze the cooked bread for up to 3 months. Just wrap them well!
You can also freeze the concha dough to use it later. Simply store in a freezer bag and when ready to use, defrost over night in the fridge. Then shape and continue as per the recipe.
To freeze the shaped conches with the topping, place them covered on a tray and put them in my freezer, then wait until they're frozen and put them in a freezer bag. To bake, defrost until they rise and then bake as per the recipe.
If you make this recipe, don't forget to tag us on Social Media and comment and rate below.
Other Bread recipes you will love:
📖 Recipe
Conchas Recipe
Ingredients
Concha Bread
- 500 g Plain or Strong Bread Flour
- 150 g Caster Sugar
- 7 g Yeast Dry Active or Instant
- 5 g Salt
- 2 large Eggs
- 1 teaspoon Vanilla Extract
- 120 ml Evaporated Milk Or Full Fate
- 100 g Unsalted Butter
Streusal Topping
- 100 g Butter
- 100 g Caster or Granulated Sugar
- 120 g Plain Flour
- 1 teaspoon ground Cinnamon Optional
- 5 g Cocoa Powder Optional
- Food Colouring Optional
Instructions
- Bloom Yeast - As with any bread recipe, if using Dry Active Yeast, you will need to bloom it in the warm liquid from the recipe for about 10 to 15 minutes, before adding it to the rest of the ingredients. Add yeast to the luke warm evaporated milk and set aside.
- Next add Plain flour or Bread Flour and sugar to the bowl of a stand mixer. Then add salt and yeast (with milk if bloomed beforehand) at opposite ends. Mix to combine.
- Mix in the eggs and vanilla extract and slowly add the milk (if you haven't already added it with the yeast), in bit by bit, mixing in between.
- Add the butter slowly and beat on medium/high for 10 minutes.
- Place the dough on a floured surface and shape into a ball. Place in a greased bowl, cover with a damp cloth/cling film and rest in a warm place for 2 hours or until doubled in size.
- Once the dough is ready, divide into 18 pieces. To shape the balls, lightly flour your hands and place over a ball of dough, then rotate your hands over the top to form a ball. Continue with remaining dough.
- Place onto a lined tray and brush dough with melted butter or a little oil. This is an optional step but helps the streusel to remain in place.
- To prepare the streusel topping, add sugar to the butter in a bowl and beat together using a spoon/whisk. Now add in the flour little by little and cinnamon too if using. Set aside for later.
- If making the Conchas in different colours, divide the dough in seperate bowls accordingly and add the cocoa powder to one mixture, leave 1 plain and add red food colouring to the final bowl, mixing each mixture well until combined.
- To add the topping, flour your hands and divide the topping paste into 18 balls. Shape with your hands into a round disk and place on top of a ball of dough. Continue with remaining mixture. Use a knife to decorate as you wish or into the design of a traditional concha shape (seashell).
- Now leave to rise in a warm place until they are almost double in size. Around 1.5 hours.
- Bake in a preheated oven at 165°C/Gas Mark 3 for 20 minutes, rotating midway.
Notes
Tips and Tricks
- You can use Plain Flour in this recipe but Bread Flour makes for softer bread in this recipe.
- If using Dry Active Yeast, you will need to prove yeast in the warm milk from the recipe for about 10 to 15 minutes, before adding it to the rest of the ingredients.
- Make sure that the yeast you’re using has not expired.Check the the expiration date, or test the yeast in some warm water. If it froths after 5 minutes, it is fine to use.
- You can prove the dough in the fridge overnight.

Leave a Reply